How to Build an Outdoor Brick Fireplace and Pizza Oven?
Building an outdoor brick fireplace and pizza oven combines masonry, heat management, and thoughtful outdoor design. The finished structure should feel welcoming, not merely impressive. Imagine a warm fire, a stone hearth, and pizzas baking beneath a darkened dome. However, beauty cannot replace safe construction.
This guide explains the planning decisions behind a durable installation. You will learn how to choose a stable foundation, suitable firebricks, refractory mortar, and weather-resistant outer brickwork. The firebox and oven chamber require materials designed for repeated high temperatures. Standard decorative bricks may crack or fail when exposed to intense heat. Local building codes, fire clearances, chimney requirements, and property restrictions also deserve careful attention. Check them before buying materials.
Small details matter. A level base prevents uneven loading. Proper drainage protects the foundation from freezing moisture. A correctly shaped oven opening improves airflow and heat retention. The chimney should release smoke safely, away from windows, roofs, and seating areas. Never rush the curing process. Slow, controlled fires help remove trapped moisture and reduce cracking.
Some projects look simple in photographs. They are not always simple in practice. Brick cutting may be imperfect, and the first fire might reveal flaws. That is useful feedback, not failure. A careful builder measures twice, reviews each joint, and asks a qualified mason or inspector for advice when uncertain. With realistic planning and reliable materials, this outdoor cooking feature can become a safe, practical, and lasting part of your home.
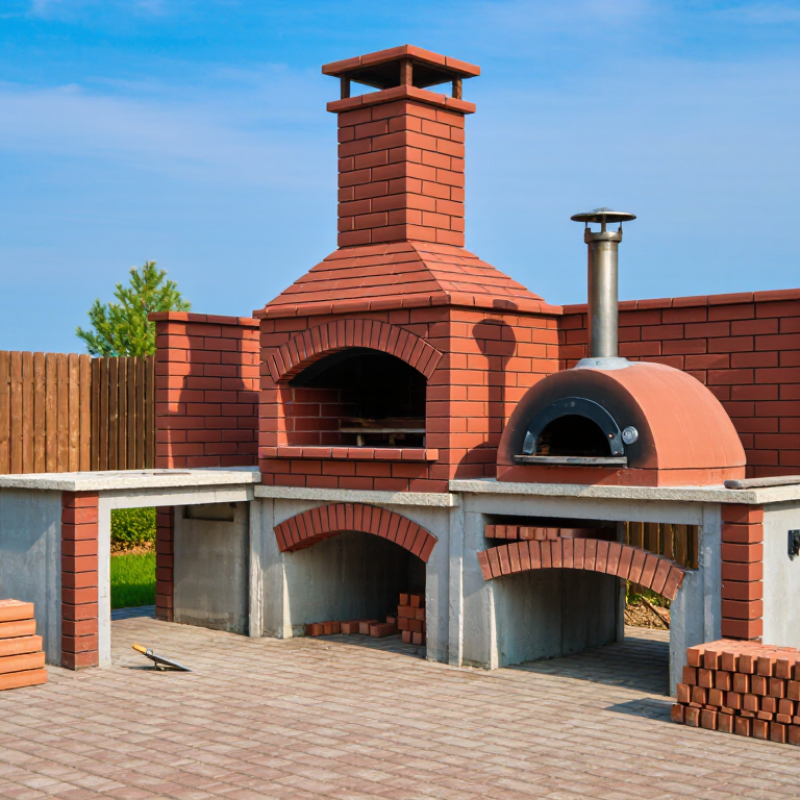
Table of Contents
[Hide]
Choose a Safe Location and Plan the Fireplace and Pizza Oven Design
Choose the location before choosing the bricks. Keep the fireplace and pizza oven away from wooden walls, fences, dry vegetation, and overhead branches. Local building and fire codes may require specific clearances, spark protection, and chimney height. Check them before excavation. Wind changes everything. A site that feels calm at noon may blow smoke toward windows at dinner.
The National Fire Protection Association’s Home Structure Fires report found that cooking equipment caused about 53% of reported home structure fires from 2017 to 2021. That figure is not limited to outdoor ovens, but it shows why fire separation matters. I would place the oven on a noncombustible slab, with clear access around the loading mouth. Avoid narrow corners. Leave room for tools, wood storage, and safe ash removal. The U.S. Environmental Protection Agency also warns that wood smoke contains fine particles, so keep exhaust away from doors, windows, and outdoor seating.
Plan the design around heat movement, not appearance alone. Use a properly sized hearth, insulated oven chamber, and chimney designed for the fuel and local rules. The opening should face away from prevailing winds when possible. A smoke test with a small, supervised fire can reveal poor draft before full construction. My first layout might still be too optimistic. Recheck clearances after adding benches, a roof, or decorations. Small changes can create large fire risks. Don’t rush this part.
| Planning Dimension | Recommended Guideline | Practical Design Data | Safety and Construction Notes | Pre-Build Check |
|---|---|---|---|---|
| Location | Choose a level, stable, well-drained area outdoors. | Allow a working zone of at least 1.2 m in front of the oven and fireplace. | Keep the appliance away from dry vegetation, wooden fences, sheds, low branches, and combustible outdoor furniture. | Inspect the area during both dry and windy conditions before construction. |
| Clearance from Structures | Use the clearance required by local building and fire regulations. | A common planning target is at least 3 m from buildings and combustible structures unless local rules require more. | Clearance requirements vary by jurisdiction, appliance design, roof overhang, and chimney height. | Confirm setbacks with the local building department or fire authority. |
| Overhead Clearance | Position the chimney away from combustible roofs and overhead branches. | Extend the chimney above nearby rooflines according to local code; the highest nearby roof surface is often the controlling reference. | Do not place the oven directly under a timber pergola, fabric canopy, or low roof unless the entire assembly is specifically designed and approved for heat exposure. | Check the complete chimney path, including roof penetrations and possible wind-driven sparks. |
| Foundation | Build on a non-combustible reinforced base designed for the total load. | Provide a level slab or footing sized beyond the oven footprint, commonly extending 150–300 mm on each side. | The base must support the masonry, insulation, cooking floor, chimney, and roof without settlement or cracking. | Verify soil stability, drainage, frost depth, and local footing requirements. |
| Typical Overall Footprint | Plan enough space for the cooking chamber, insulation, masonry shell, landing, and chimney. | A compact combined installation may require approximately 1.5–2.4 m wide by 1.2–1.8 m deep, depending on the design. | Include access for firewood storage, ash removal, maintenance, and safe movement around the hot opening. | Mark the proposed footprint on the ground before ordering materials. |
| Pizza Oven Cooking Floor | Use refractory firebrick or another material rated for repeated high-temperature heating. | Typical residential cooking-floor thickness: approximately 50–75 mm. | Set the floor on a continuous insulation layer so heat is retained and the supporting slab is protected. | Check that all cooking-surface materials are food-safe and free from toxic coatings or sealers. |
| Pizza Oven Interior Size | Size the chamber according to the intended cooking capacity. | A useful small-to-medium chamber is approximately 750–900 mm internal diameter, with about 350–450 mm internal height. | A larger chamber needs more fuel, longer heating time, stronger support, and a larger chimney system. | Confirm that the planned opening, cooking floor, and turning space suit the pizza size and tools. |
| Oven Door Opening | Balance access, heat retention, and smoke control. | A common planning ratio is an opening height of about 60–65% of the internal dome height. | An excessively tall opening can release heat quickly; an excessively low opening can restrict loading and smoke movement. | Make a full-size cardboard or plywood template before building the arch. |
| Dome and Firebox Materials | Use refractory masonry in areas directly exposed to flame and high heat. | Use refractory firebrick and refractory mortar for the oven chamber; use ordinary brick only where it is outside the hot-face system and suitable for the environment. | Do not use galvanized metal, painted metal, concrete blocks, or ordinary mortar as the exposed cooking-chamber lining. | Follow the material manufacturer’s temperature and installation limits without relying on brand-specific assumptions. |
| Thermal Insulation | Insulate both beneath the cooking floor and around the dome. | Common planning ranges are approximately 50–100 mm beneath the floor and 75–100 mm around the dome, using high-temperature insulation. | Insulation reduces fuel use, improves temperature stability, and helps protect the outer masonry shell. | Ensure insulation is dry, continuous, and not compressed by structural masonry. |
| Fireplace Firebox | Construct the firebox from refractory materials with a non-combustible hearth. | Provide a level hearth extending beyond the fire opening to catch sparks and embers; a 300 mm or greater front extension is a practical planning target. | Separate the hot firebox from combustible framing with approved insulation and required air gaps. | Check ash-cleanout access and ensure embers cannot fall into wood storage or wall cavities. |
| Hearth Height | Set the cooking surface at a comfortable and safe working height. | A common ergonomic range is approximately 900–1,100 mm above the finished standing surface. | Higher hearths improve access but may increase the overall center of gravity and structural load. | Test the proposed height with a temporary platform before final masonry work. |
| Chimney and Flue | Provide a properly sized, vertical, non-combustible flue for smoke and combustion gases. | Use the flue area and chimney height specified for the selected fireplace and oven design; avoid unnecessary bends and horizontal runs. | The chimney must be stable, weatherproof, properly supported, and fitted with a suitable rain cap or spark-control component where required. | Have the chimney layout reviewed against local fireplace and solid-fuel appliance requirements. |
| Masonry Movement | Allow hot components to expand independently from the decorative outer shell. | Use a continuous high-temperature expansion gap or approved separation detail between the oven hot-face and outer masonry. | Directly bonding dissimilar layers can cause cracking as refractory and ordinary masonry heat at different rates. | Plan movement joints before laying the first course of brick. |
| Drainage and Weather Protection | Protect the structure from standing water and repeated freeze-thaw cycles. | Use a sloped, non-combustible countertop or roof with positive drainage; keep water away from insulation and chimney joints. | Moisture trapped in masonry can turn to steam during firing and cause dangerous spalling. | Install flashing, caps, and sealants only where they are rated for exterior heat and weather exposure. |
| Curing Schedule | Dry and heat-cure the masonry gradually before normal cooking. | Allow the mortar and render to dry according to the material instructions, then use several small fires that increase gradually rather than one intense fire. | Rapid heating can create steam pressure, cracks, or spalling in damp masonry and insulation. | Inspect for cracks after each curing fire and stop if masonry begins to fracture or shed material. |
| Fuel Storage | Store only dry, clean, untreated firewood in a separate ventilated area. | Keep wood, paper, and kindling outside the hot zone and away from doors, vents, and ash-cleanout openings. | Never burn painted, pressure-treated, glued, or chemically treated wood because it can release hazardous fumes. | Provide a covered but ventilated storage compartment that cannot transfer heat to the fuel. |
| Operating Safety | Use long-handled tools, heat-resistant gloves, and a metal ash container with a tight-fitting lid. | Keep a suitable fire extinguisher and a reliable water source accessible, while avoiding water contact with hot masonry. | Never leave an active fire unattended and keep children and pets outside the marked hot zone. | Prepare written operating and emergency instructions for everyone using the fireplace or oven. |
| Permits and Inspection | Obtain approvals before excavation or construction when required. | Requirements may include building permits, solid-fuel appliance rules, chimney inspection, property-line setbacks, and outdoor burning restrictions. | Local regulations take priority over general planning dimensions and may impose stricter limits. | Contact the local authority and homeowner or property manager before purchasing materials. |
Related Posts
-
7 Best Outdoor Brick Fireplace With Pizza Oven Kits
-
7 Tips for Choosing an Outdoor Fireplace Pizza Oven?
-
7 Tips for Buying an Outdoor Pizza Fireplace
-
Top 10 Outdoor Pizza Fireplaces for Global Buyers?
-
Top Brick Pizza Oven Fireplace for Outdoor Cooking?
-
Why Is Cooking Pizza in an Outdoor Fireplace So Popular